PolyGel is a real mix of hard Gel and acrylic created out of a desire to produce a product that had everything nail techs liked about acrylics and gel solutions while eliminating the things they didn’t.
Polygel nails are a composition that may mold full and lightweight nail extensions or make overlays. It’s more durable and more rigid than typical gel polish, and it’s far easier to work with than sculpting hefty acrylic nails.
Polygel comes in the form of a paste to shape it with your Polygel brush, and it will stay put. It’s much thicker than conventional gel nail varnish or Builder Gel, and it won’t self-level so that you can create a beautiful arched apex for your manicure.
Polygel, unlike acrylic nail extensions, does not solidify or cure in air. It also does not have the overpowering odor of synthetic nails! Given all these features, you should have prior knowledge of properly prepping nails for Polygel.
This will ensure the longevity and better outcome of your Polygel nails.
Prepping for the Longevity Of Polygel Nails
Polygel will stay on your nails for as long as you want it to and will grow out ideally if applied and cared for properly. It won’t chip or flake after curing.
If you’re going to use it to stretch your nails, make sure you develop a solid apex to offer your nails balance and strength.
It entails applying a slightly larger bump of Polygel to your nail above the nail bed, resulting in less pressure being given to the tips of your nails when doing daily duties such as typing or dishwashing, and a lower risk of your nail extensions cracking or breaking.
To guarantee adequate adherence, you must also carefully prepare your nails. It is the same prep that you would do for conventional gel polish. Polygel nails are highly robust; therefore, they won’t break if done correctly.
Things To Know Before Doing Polygel Nails
📌PolyGel is sculpted with a liquid called Slip, which the slip potters influenced use while working with clay. Slip isn’t a monomer; it doesn’t include any active chemicals and, unlike acrylic monomer, has a mild, pleasant scent. The lip solution’s sole purpose is to make it easier to form PolyGel.
📌PolyGel, unlike hard Gel, does not self-level and stays put; unlike acrylics, it does not harden until cured under an LED or UV lamp.
📌In an LED lamp, the cure time is roughly 30 seconds, whereas, in a UV lamp, the cure period is two minutes. Heat spikes do not take place during the curing of PolyGel nails. After curing, there is no sticky coating.
📌PolyGel is more versatile than acrylics, tougher than hard gels, and lightweight than both of these materials.
📌The product may be used as a tip overlay on natural nails or molded over a form.
📌The six hues offered are bright white, natural clear, delicate white, soft pink, deep pink, and cover pink.
📌Colors from Gel-polish may be put on the item, and Gel can be blended with PolyGel to make a pattern.
📌Preparation for natural nails is the same as for gel nails. You can use a nail tech, an electric nail drill, or a hand file to shape the product.
📌The material should be filed away rather than soaking away. After filing, you may use nail techs or soak to remove any residual substance.
📌Rebalancing PolyGel nails is similar to rebalancing acrylic or gel nails.
Common Mistakes While Doing Polygel
The most common mistakes women make while doing their nails using Polygel are listed below.
🎯Using An Excessive Amount Of Liquid
In addition to the Polygel, most products include a specific liquid called slip solution that you must use to keep the brush from sticking too much. If you use too much slip solution, the product may liquefy and perhaps begin to drip. If the nail seems to be moist, wait until the liquid evaporates before curing.
🎯A Sticky Base Coat Layer
Some bases have an excessive amount of sticky layers. It’s also inconvenient to apply Polygel on it. If you have a sticky base coat like this, it’s best to remove it first and then apply the product.
🎯Too Thick Towards The Cuticle/Side Walls
You may not realize that specific product components have already fallen to the sides or are too near the cuticle. After a few weeks, it will only become apparent when the product begins to lift. Always inspect these areas: around the cuticles, along the side walls – they should be thin at all times.
🎯Too Near To The Walls On Both Sides
After a few days, if the substance even slightly contacts the skin, it will begin to lift. Always ensure a little space between the product and the skin along the cuticle and sidewalls to avoid this. You must not allow the product to come into contact with the skin!
🎯Too Much White
Some colors are pretty vibrant. There is too much pigment in white and dazzling white. As a result, never apply them too thickly. When the layer is extremely thick, LED light cannot get through it, and the product remains soft in the center. Such a nail is prone to breaking. Split the technique into 2-3 parts if you want long nails with a white free edge.
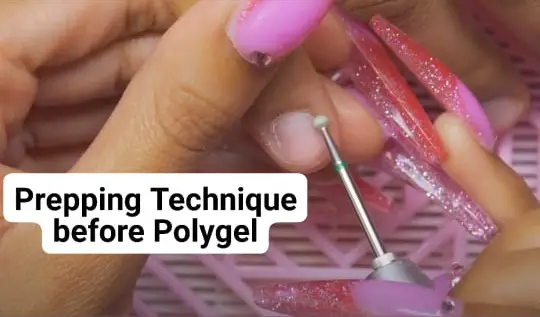
Prepping Polygel Nails The Right Way
For long-lasting nails, nail prep is always a must. You wouldn’t want your nails to snap off readily. You understand the agony of working on it all night and designing it. It would be ideal if it could endure at least a couple of weeks. Follow these simple measures to see if you can make it last a little longer. To properly prepare your nail, follow these steps:
- Hands and nails should be sanitized. Remove any extra cuticle from the surrounding nail plate by pushing it back.
- Using a file of your choice, shape the natural nail.
- Using a decent 100/180 Nail Buffer, gently buff away the shine.
- Wipe and wash the nail with an Alcohol Nail Pad or Nail Surface Cleanser, and a Lint-free Nail Wipe to eliminate all dust.
- Apply a coating of Nail Prep or Nail Dehydrator on your nail plate.
- On your nail plate, apply a thin coat of Nail Primer.
- Finally, it’s time to start applying your base coat and doing anything you want with your nails!
- Just keep these pointers in mind, and it will last much longer than you expected!
Conclusion
Polygel nails are still very uncommon, so many nail artists must continue to educate themselves on the method. When it comes to Polygel, certain brands may be heavier than others, and some treatments may be more challenging. Polygel is a substance that you need to get used to and discover the correct brand for you. If you’ve never had fingernail extensions before, the sensation of having long nails may be unusual at first. Still, if you enjoy having longer nails, Polygel is an excellent option.
Topic: Polygel Nails
- How To Dry Polygel Without UV Light?
- Do You Need A Nail Drill For Polygel?
- How To Do Polygel Nails With Tips?
- Drying Polygel Nails – Everything You Need To Learn
- Polygel Vs Builder Gel – All You Need To Know
- Detailed Guide On Polygel Slip Solution Substitute
- How To Do Polygel Nails With Dual Forms?
- Can You Use Polygel Nails Without a UV Light?
- Can You Use Polygel On Bitten Nails?