Nail tips are a boon for people with brittle or short, bitten nails. Even if your nails are healthy a tip gives you the privilege of extending your nails in just a few minutes. And when it comes to polygel nails, it definitely is my favorite. Being a nail tech, I have always recommended my clients to go with Polygel nails with tips for long-lasting mani.
Here in this article, I will give you my detailed guide on how to achieve perfectly sculpted polygel nails with tips at home. There are also some handy tricks scattered here and there, in the article which I got after becoming a nail tech, that changed my Polygel application and improved the outcome drastically.
So do read it with your full attention.
Easy Polygel Nails Application With Tips:
Have you ever wanted a French manicure; however you couldn’t get your nails to grow long enough?
Sculpting a fingernail extension is an excellent technique to achieve your desired look without waiting for your natural nails to emerge. It may appear not very easy, but with the aid of PolyGel, it’s a cakewalk!
One of the simplest methods to produce stunning and long-lasting manicures is to use PolyGel. As a result, even if you don’t have much prior nail expertise, it’s one of the most significant ways to perform your manicures at home.
Polygel is a combination nail polish compound initially developed for nail professionals, although it is now available in at-home kits.
It combines the advantages of acrylic and gel nails. It’s essentially an acrylic powder and transparent gel nail improvement that you may use to create the perfect pair.
It’s a moldable gel mixture that you can shape into whatever shape you like. The all-in-one recipe eliminates the need for ratios, blending, or monomer and allows nail professionals complete control over shaping and layering your perfect nails.
How Practical it is to have Polygel Nails With Tips?
Polygel is very user-friendly since it does not set until cured, allowing your technician to take their time achieving the flawless nail aesthetic you desire.
It’s available in various hues and finishes, much like regular nail paint. The gel is put with an acrylic brush over your natural nails in the same manner as you apply it to tips or extensions.
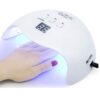
It’s brushed on and sculpted, then cured with an LED or UV light, precisely like gel polish.
Polygel, like dip powder fingernails, has grown famous for various reasons, but one of the most notable is how long it stays.
A Polygel manicure may last up to three weeks with proper care and application. Polygel nails are trendy among ladies since they do not harm or spoil their nails.
There’s no necessity to be concerned about damaging your natural nails if they’re applied and removed correctly. Your nail technician will scrape the Polygel off your nails to eliminate most of it.
Any leftover formula or product will be washed away with acetone, making your nails clean and prepared until your next manicure.
How To Apply Polygel Nails With Tips?
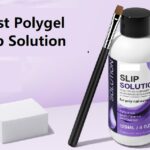
With years in the nail tech industry, if I have picked some highly useful and game-changing tips, the following is definitely one of them. The main trick to make polygel application with tips seamless and the end result 100 times better is to use a good quality slip solution.
And there is only a handful of effective polygel slip solutions in the market to choose from. If your Polygel kit does not have one then buy it first. It is a priority trust me. I recommend the Morovan Slip solution or you can read my article on the best polygel slip solution for more info.
Polygel placed using nail tips tends to last longer than Polygel that is applied free-standing. It’s because the tips act as a basis for the Polygel, preventing it from breaking. However, the application technique makes a huge difference in terms of the longevity of the nails.
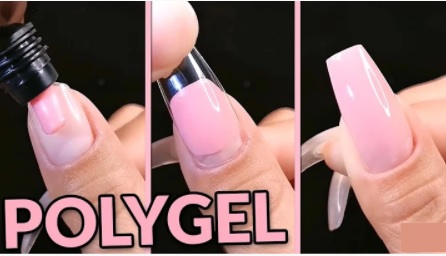
Take a look at how to sculpt a stunning PolyGel manicure with tips while giving your nails an exquisite aesthetic in this step-by-step guide.
First and foremost, obtain Polygel. The polish from Morovan is a popular choice among women, and the business makes things simple with their all-in-one PolyGel at-home package. You may also try the ModelOnes home Polygel kit, which comes with a self-standing UV lamp and nail extensions, which you can use to apply your long-lasting manicure on.

- The first step is to prepare your fingernails by pushing your cuticles back and filing them with a moderate grit nail file. You need to prepare your natural nails the same way gels are prepared: they must be free of polish, filed, and buffed to remove any shine.
- Second, wipe your nails with acetone or rubbing alcohol to clean them.
- On your natural nails, apply a coat of dehydrator and a coat of nail primer.
- After that, you may glue your nail tips on.
- After that, apply the base coat all over your nail and then your Polygel.
- Now, shape the nails to your taste using a brush soaked in slip solution.
- Cure the Polygel for around 60 seconds after sculpting, then wipe away the sticky coating with rubbing alcohol.
- Finally, smooth down your nails with a file before applying your topcoat or nail color.
Polygel nails are preferable to acrylics because they don’t firm until you cure them underneath an LED or UV light, so you won’t have to rush through the process.
Polygel nails are also said to be more durable than gel nails. Overall, the recipe is designed to blend the features you love about gel and acrylics while eliminating the features you don’t, resulting in a powerful yet lightweight choice.
How To Remove Polygel Nails?
Removing Polygel nails correctly is equally important as applying polygel nails with tips. Ensuring proper removal keeps your nails healthy.
You can clean Polygel with acetone, just like gels; thus, there’s no need to use specific techniques. Experts advocate scrapping the hard topcoat with a file before soaking to make the removing process easier.
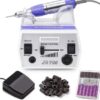
A standard nail file should be sufficient; however, if the gel is exceptionally thick, you may require an E-file or electronic nail drill.
Soak your fingernails in acetone and file until the polish is entirely gone after that coating breaks. Throughout this procedure, you’ll want to be calm and cautious.
When it comes to nail plate damage, the removal makes the difference. You risk damaging your nails if you pull or tear them off; if you’re using Polygel, conventional gels, or acrylics, so give the tips some delicate TLC, so they remain strong and healthy before your next manicure.
Conclusion
Manicures made with Polygel can endure for two to four weeks.
The duration of your Polygel manicure, as well as your lifestyle, will determine how long it lasts.
Your Polygel manicures may not last a month if you engage in activities that are hard on your hands every day.
Polygel, the same as acrylics, is more costly, but it can last nearly twice as long as a standard gel manicure.
It isn’t easy to detect when a light pink or nude manicure has stretched out, so it lasts longer than you may imagine.
More Articles On Polygel:
- Drying Polygel Nails – Everything You Need To Learn
- Polygel Vs Builder Gel – All You Need To Know
- Detailed Guide On Polygel Slip Solution Substitute
- How To Do Polygel Nails With Dual Forms?
- Can You Use Polygel Nails Without a UV Light?
- Can You Use Polygel On Bitten Nails?